My Parallel Processed Bass Rig Part 1: Why Parallel Processing?

I’ve wanted to write this post for a long time. It’s a sort of reply, or alternate take on Johnny Ragin, AKA, Worship Sound Guy’s YouTube Video, “My Super Weird Trick for HUGE BASS.” I’d like to take the approach from a bass player’s point of view. If you’d like, you can watch it below. If you don’t want to watch it, keep scrolling.

After looking at the date, I realised Johnny posted this video a year ago. Where did the time go? It’s a cool video that explains a lot and does a great job of explaining it in terms a layperson could understand. A layperson is a sort of kinder gentler way to describe a novice. Johnny shows how to do this in Pro Tools, THEN he turns around and does it on a Behringer X32. The cool thing is that this trick is pretty easy to pull off on any digital console, and can be super simple in analog world too.

So What is Parallel Processing?

I would define parallel processing as splitting an audio signal into two or more paths with separate processing applied to each signal path. If that sounds scary to you, chances are you’ve done this before and not even thought about it. On an audio console any time we use an auxiliary send to add reverb to a vocalist, we are adding a parallel processing path. The vocalist’s voice goes straight into the console’s channel strip and splits at an aux send. The voice continues through the channel strip; equalisation applied, and the level controlled via the fader. The aux send sends the signal to a reverb processor. That reverberated signal gets mixed back into the console on either another channel, an aux return, stereo return, or something like that. Usually, if you mute the reverb, you can still hear the vocalist.

But Why Though?

Why not parallel processing? Everybody else is doing it. (Peer pressure is not a good reason to do something, by the way.) Chances are, every single bass you’ve heard on a recording is parallel processed. I don’t have stats for that, but if I had to guess, I would say at least 95%. I would also venture to guess that if you’ve been to a concert, especially nationally touring acts, they also process their basses in parallel. Here are a few reasons why.

Why It Works for Clean Bass

Clean bass tone is the anchor of a lot of music. . Several bassists such as Marcus Miller, Tony Levin, Nathan East and others have built entire careers off of clean tones and virtuosic playing. Some people would define this as a "hi-fi" tone. You can get a lot of low end out of a clean rig. So you may be asking yourself, "what's the problem? Don't we want low end?” The answer is a resounding yes.

The problem with a clean bass tone is, that, believe it or not, it can get lost in the mix. The fundamental note of the bass drum can compete with it. In modern music basslines played by synthesisers, or coming from backing tracks fight with the bass guitar for space in the mix. 

We can work around this. Add a second bass channel with a distorted amp, or pedal. Mix back and forth to taste. Distortion adds harmonics. The harmonics start to move into the midrange frequencies, which can make the bass easier to hear and differentiate from the synth or backing tracks.

Why It Works for Dirty Bass

Distorted, or fuzzy bass can sound really cool. You’ve heard it. Pretty much every rock song of the 1970s has a gritty sounding bass. Muse is an excellent example of a band that uses distorted bass well. They’re a three-piece band, so sometimes the bass player adds distortion to the bass to sort of taking over what a rhythm guitar player would do. By taking over the rhythm guitar parts, the bass player frees the guitar player/vocalist up to play leads and sing.

Unfortunately just adding distortion or fuzz to bass can sometimes eat the low-frequency stuff that bass usually plays. It can thin out the tone and make it almost sound like another electric guitar. That’s great if that is your goal. If not then splitting the bass signal and running it through a clean amp, and a distorted amp can bring that missing “oomph” back. If you need more “oomph” simply blend in more of the clean amp.

Why It Works for Other Effects

The reason parallel processing works for basses with effects on it is the same reason it works so well for distorted or fuzzed bass. Any time we add an effect like chorus, flanger, phasers, envelope filters, or whatever, we can lose some of that oomph that our instrument has. This is especially apparent in the low end. By splitting our signal and always having a straight, “clean” tone available, we can negate that loss by mixing what we need back in.

My Parallel Processed Bass Rig Part 2: The Gear” is up next where I give a little information about the gear in my bass rig.

Recording From Your Digital Console: Choosing Recording Software

Picking Up the Lingo I'm going to start off and just throw a few terms that I might use in the series out there. That way we're all on the same page, and I don't have to type the words "recording software" every other sentence. This may also help as you explore the interwebs and research what options might be best for you. So, without further ado-

The Terms:

DAW- This stands for Digital Audio Workstation. This is what we generally call the software, whether it's Pro Tools, Cubase, Studio One, Reaper etc.

ITB- This is simply an abbreviation of IThe Box. The box in this case is your computer. Some recording engineers prefer to mix out of the box, meaning they're using an audio console to mix their recording projects. Some prefer to mix in the box using the faders in the software.

Plug-Ins- Plug-Ins are virtual equalizers, compressors, reverb and other effect units.  In analog world we would typically patch or plug these into our mixer using cables. Many times ITB we just use a drop down menu.

DAW's- The Contenders:

I'm going to start by answering this question with a question. Which DAW do you like? There are free options like Audacity (which doesn't play nicely or at all with Audinate's Dante Virtual Soundcard. It could have been a problem on my end.) Reaper is a nearly free option ($60 for students or non-profits $255 for everybody else.) Both of these are distributed directly from their websites

Then there's the paid options.  Most people have heard of Pro Tools. It's an industry standard in the professional recording world. Then there's others like PreSonus' Studio One, Steinberg's Nuendo & Cubase  family of products, Sonar by Cakewalk, and Apple's Logic. Each one of these has it's own set of advantages and disadvantages.

So Which One Do I Choose?

It really depends on your end result, and your workflow. Personally I don't have a lot of hands-on time with the Steinberg family products, or Sonar. My two personal favorites are Pro Tools and Studio One. I typically use Pro Tools the most.  I'm just used to the workflow, the keyboard short cuts, and I like the routing matrix.  I would encourage anyone with a little time on their hands to download demo versions of any of  these software packages and try them out. See which one you like.

~Andy

Recording From Your Digital Console: Choosing A Computer

MacVPCCutting to the Chase Buy a Mac.

But Seriously

Buy a Mac. (Are we beginning to see a bias?) This article is a bit tongue-in-cheek.

My Case Against Windows

Have you ever been computer shopping? On the Windows side of things you have Dell, HP, Gateway, Acer and others. Then there's the specialized machines from companies like ADK, Alienware, or Music XPC.  That's seven different manufacturers that I've listed off the top of my head.  Some of those companies have as many 15 different product lines. Each one of these uses different chipsets, different USB and Firewire buses. If you want to see what's available feel free to go to a website like Tiger Direct (www.tigerdirect.com) or New Egg (www.newegg.com.)

My point is, the operating system, Windows, has to be compatible with all of these different machines. It also has to work with all of these different parts. That's a lot of programming code.  There's a great opportunity for something to just not work quite right. When things do go wrong, who do you call? Microsoft? Dell? The mother board manufacturer?

Finally, what version of Windows do you buy? Home, Professional, Ultimate? 7 or 8? Lots of choices. These choices can affect how your computer and audio hardware interface with each other. I will say this. If you are considering Windows 8 for a recording/production machine- wait. The various audio software/hardware manufacturers still need time to update software/hardware drivers. (I would actually say the same thing if Apple just released a new operating system.)

The Argument for Mac

There was a period in my life that I worked in the Keyboard & Recording department at a chain music store. Typically if a customer purchased any recording, or music creation software from me, I'd offer to help them get it installed if they had issues. Granted at this particular time there was a version of Windows called Media Center Edition. That particular version would absolutely not work with external sound cards. Period. Ever. Other than that, it would often take multiple install attempts to get a particular software working. I rarely had Mac users come in with trouble. Things boil down to this. How much time to you want to spend trouble shooting your gear, vs how much time you want to be using it.

If you happen to visit the Apple website, you'll notice there are only five series of computers.  That's considerably less than the plethora of  Windows options. Your choices are two laptop lines, and three desktop lines. Then you have to take into consideration that Apple builds it's own computers, and their operating system (OS X.) That has to guarantee a certain level of cooperation between the software and hardware.

My final argument is that OS X, Apple's operating systems supports Aggregate Audio Devices.

What Do Aggregate Devices Do for Me?

In simple terms they allow you to use multiple sound cards within OS X or within applications that support it. Why is this useful? Well, let's look at our scenario from the previous post in this series. In this case there was a digital audio console at front of house, pumping 32 channels of audio to a computer back stage via a Dante network.  The computer was using Dante's Virtual Soundcard. Unfortunately, because it was a Windows based machine the only audio device it could use was the virtual sound card.

This was extremely problematic for using local audio monitors. One work around would be to close the session, and then re-open it.  Then an Avid M-Box, PreSonus Audio box, or similar device could then be used to connect studio monitors. This would not offer real-time monitoring of input. A second option would be to add another Dante device to the network, in the broadcast room to connect a pair of studio monitors to.

By setting up an aggregate device inside Pro Tools, you can then use the Dante Virtual Soundcard (in this particular case) for input, and select an M-Box or other small interface to use as output for local monitoring.

~Andy

Illuminating DMX: Part 3 B- DMX Protocol Charts vs Faders

lights and charts and stuff What Are We Trying to Accomplish?

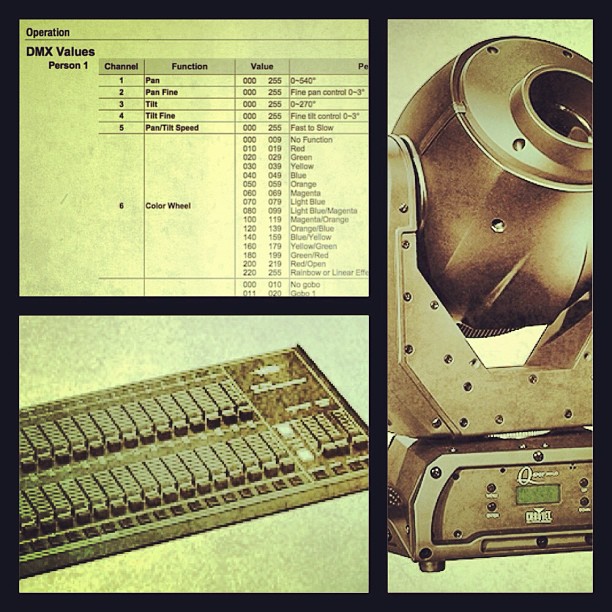
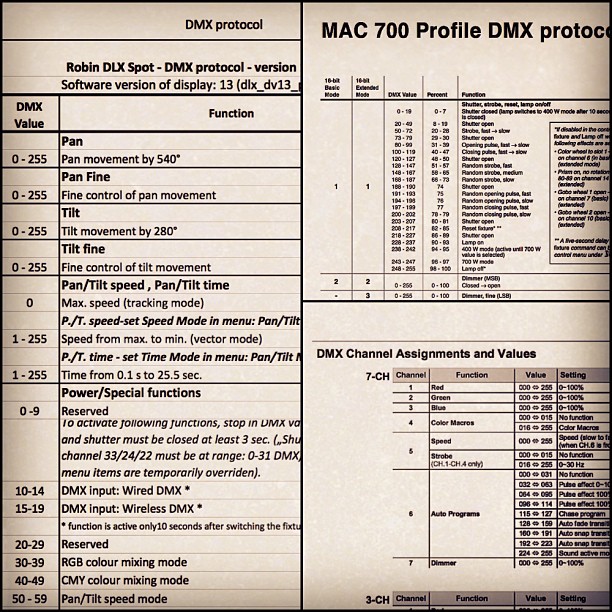
In my last blog we talked about DMX Protocol, or implementation charts. They're basically a list of parameters that can be controlled with a DMX controller. In this post we're going to look at how faders on a basic controller transfer to controlling parameters on a moving head light.

Something To Note:

I have forgotten to mention this important fact in previous posts.   DMX transmits data in 256 steps, in numbers ranging from 0 to 255. So if your fader is all the way down at zero, you're sending number value 0 down that DMX channel.  If your fader is at 100 %, all the way to the top, then you're transmitting number value 255. Certain parameters in a lighting instrument are looking for a specific value to perform a specific function. For example on a Chauvet Q-Spot 360, if you transmit between values 10 and 19 on channel 6, you tell the color wheel to rotate so that the light's output will be red.  If you change that value to 47, the color wheel will turn to blue.

What Are We Using?

I initially thought about using a higher end instrument like a Robe Robin DLX Spot, and a Chauvet controller for our example. I thought about it, I decided to go with a more affordable lighting instrument that a band or small club might have. I also decided to go with a non-programmable controller that would still be fairly common. This wouldn't be the ideal situation at all, and we'll get to why eventually. Here's what we're using

Light:

I recently special ordered a Chauvet Q-Spot LED 360 (www.chauvetlighting.com) for a customer. They are using for a travelling trade-show booth.

Controller:

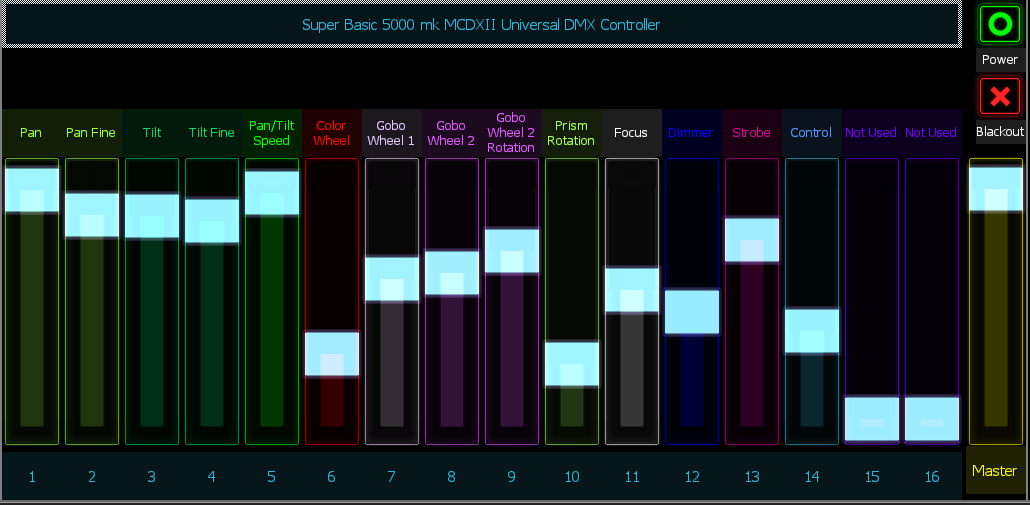
For our illustration, I'll use an "Super Basic 5000 mk MCDXII Universal DMX Controller." It's a completely made up 16 channel controller. They don't really exist but it was easy to draw in the software I use. I chose this because I can create a basic drawing with faders and label them. This will help you visualize how the faders will correlate to parameters on the light.

We'll pretend it's similar to aLeviton (Formerly NSI) N7016-D00 Console (www.leviton.com) because it is a fairly common console to find in houses of worship. It's a basic 32 channel DMX controller. You can either use it to control 32 channels, or control 16 channels and have two scenes.  That's it. 32 channels of control. No programming. Two scenes. They were really designed to control dimmers, but today we're connecting a mover to it.

What Do We Need To Know?

I always recommend reading the manuals first. This will at least get you in the ball park on how to operate your gear. For our example we'll assume the manuals have been read.  Let's take a look at our equipment.

  1. Our pretend 16-channel controller controls 16 DMX Channels. Since it's not a very fancy controller, there's no LCD Display to tell us what value we're transmitting on each DMX channel. The basic Leviton controllers work the same way.
  2. The Chauvey Q-Spot 360 can operate in two modes. On this instrument they're called personalities. Other manufacturers call them modes. It's important to note that we can run this in an 11 Channel mode or a 14 Channel personality (mode). This dictates how many DMX channels the instrument uses. (Manual Here.)

How Do We Do This?

  1. We'll need the DMX Protocol Chart for the Q-Spot. It's in the manual. We'll need to look at the 14-Ch personality.
  2. We need to connect the power cables, DMX cables and power things on.
  3. We need to properly address the Q-Spot. Since our controller only goes up to 16channels we have to stay under address 016. We also have to keep in mind that we're running the light in 14 channel mode, so, for example,  if we address it at DMX Channel 013, then then we'll only be able to control 4 of the light's parameters. That means there's 10 things kinda hanging out there that we have no control over what so ever.  For this example, we'll address the light at DMX address 001. That way fader one will control the first parameter, fader two will control the second parameter and so on.

The picture below shows our basic controller. Each fader is numbered, and labeled indicating what parameter of the Q-Spot it will control.  Hope this helps!

Lighting Controller

~Andy

Illuminating DMX: Part 3 A- DMX Protocol Charts

DMX Protocol Charts What is a DMX Protocol Chart?

In basic terms you could think of a DMX protocol chart as an address book. They list what paramater of a lighting fixture is controlled at each DMX address. The charts are usually found in an instrument's owners manual.

Why Do We Need to Know This?

If we look back at  "Illuminating DMX: Part 2- Addressing", there's an example using a simple controller, two dimmer packs, and some par cans. One lighting instrument was controlled by one fader on the controller.  This was a typical system a few years ago.

Recently  however, LED lighting systems, and moving head (often referred to as movers) lights have gotten extremely affordable. These instruments use multiple DMX channels, and therefore multiple faders. The chart will tell you what fader to move to control which function of the light.

What Are We Controlling?

The functions of a lighting instrument vary from manufacturer to manufacturer. They can also vary depending on what mode the instrument is operating in. Some units even allow you to change the number of channels they use. Let's take a look at some of the parameters.

A Robe Robin DLX Profile, a Chauvet Intimidator Spot 150, and a Robe Robin DLX Wash

We'll start with some typical mover parameters:

  1. Pan- this turns the head of the mover. Like shaking your head "No."
  2. Tilt- moves the head up and down. Like shaking your head "Yes"
  3. Zoom- changes the size or diamater of the projected beam of light
  4. Focus- Changes how sharp the projected beam of light or image from the light appears. Similar to focusing a projector
  5. Color Wheel(s)- Some instruments have a wheel with fixed colors such as red, blue, green, violet, etc. This paramater would turn the wheel to the selected color. Others use a series of three wheels to mix colors.
  6. Gobo- A Gobo is a metal or glass piece that has a pattern on it, that Goes Between (hence the term Gobo) the lamp and the lenses that project an image, or can break the light beam up so it makes neat patterns in the air. A classic yet semi flawed example of this is the search light Commissioner Gordon uses to signal Batman.
  7. Dimmer- This one's pretty straight forward. It changes the intensity of the light blasting out of the instrument.

And now some typical LED wash light parameters:

  1. Red- Changes the intensity of the Red LEDs from 0 to 100%
  2. Blue- Changes the intensity of the Blue LEDs from 0 to 100%
  3. Green- Changes the intensity of the Green LEDs.
  4. Color Macros- Depending on what DMX value is transmitted, this will change the light to a pre-set color. This paramater usually overrides the Red Blue & Green (RGB) settings.
  5. Strobe- makes the instrument flash.
  6. Auto Programs- this will engage some built in color change patterns
  7. Speed- This will change how fast the auto-programs cycle.
  8. Dimmer- This would function as a master dimmer for the instrument

So What's Next?

For the next post in this series we'll take a look at an actual DMX Protocol chart and break down each paramater and how that relates to faders on a controller...  Stay tuned!

~Andy

See Illuminating DMX: Part 2- Addressing here.

Continue to Illuminating DMX: Part 3B- DMX Protocol Charts vs Faders here.

Illuminating DMX: Part 2- Addressing

Control Screen with DMX Address of a Robe Robin DLX Spot moving head instrument Why is it So Complicated?

The simple truth is, DMX isn't that complicated. We just need to take some time and understand our equipment. Different lights or dimmers use different quantities of DMX channels. For example a Lightronics AS-40D uses four DMX channels.  A Robe Robin DLX Spot moving head fixture uses up to 35 channels.

The trick is to make sure you have enough control channels to control the number of lights you have. For example an NSI/Leviton N7008-D00 is a common 8/16 Channel DMX controller. Maxed out, this little guy will control up to 16 DMX channels.  It wouldn't be wise to attempt to control the Robe with this controller. But the Leviton should work just fine for a small band playing at a local bar.

A Look at a Basic System:

As an example let's break down a "Weekend Warrior" rig from a few years ago. This would be the typical bar band set up:

(8)  PAR56 Can lights with gels(color filters)

(2)  50 ft DMX Cables

(2)  Four Channel Dimmer Packs

(2)  Lighting Tree Stands

(1) Eight Channel Lighting Controller

Let's set it up. We've got four lights on each tree. There is one dimmer pack on each tree. The controller is in the back of the room near the audio console. Each fader on the controller controls 1 channel of DMX. So fader 1, is DMX channel 1,  fader 2 is DMX channel 2 and so on.   Our signal path for our DMX signal would look like this:

Controller  => 50ft DMX Cable => 4 Channel Dimmer Pack One => 50ft DMX Cable => 4 Channel Dimmer Pack Two

Example One- Dimmers With the Same Address:

Each dimmer pack has 4 outlets on it connected to one dimmer each.. Each dimmer is controlled by one channel of DMX data. It is also important to note that because of this each dimmer pack uses four channels of DMX.  If I give both dimmer packs the address of 001, then when I push fader one on the lighting controller, then light one on both dimmer packs will come on. That patching would look like this:

Example 2- One Fader Controls One Light:

If we want one fader to control one light, then Dimmer Pack One should control lights 1-4, and Dimmer Pack Two should control lights 5-8. So our patching should look like this, if we address the dimmer packs with addresses 001, and 005:

Example 3- Overlapping DMX Addresses:


Here's another example illustrating what might happen if we make a mistake assigning addresses. Let's say we gave Dimmer Pack 1 the address of 001, and Dimmer Pack 2 the address of 003, some of our control channels will overlap like this:

Note that fader channels three and four control lights on both dimmer packs. If I push Fader 3, then it will control lights 3 and 5, and fader 4 will control lights 4 and 6.

Wrapping It Up:

Again, we're taking a very simple look at things right now.  We'll continue to look at things more in depth over the next few months.

~Andy

See Illuminating DMX: Part 1- The Basics Here

Continue to Illuminating DMX: Part 3 A- DMX Protocol Charts Here