Moving DMX onto a Network: the Elation Professional EZ Kling

Where it all begins...

I've already written a few blogs about DMX-512 (commonly just referred to as DMX.) One limitation of DMX is that generally you can only control up to 512 channels of things that need to be controlled. Those 512 channels are called a universe. When we were using PAR cans 512 channels was a lot of lights. Now, with moving heads and LED units using many channels each- it's easy to burn up a universe quickly.  For this reason, some lighting consoles have multiple outputs for universes, four or eight or so.  This means that you end up running four times, eight times, whatever times the cable to the stage- So we really need a better way to do this...

Enter Art-Net

Art-Net is that better way.  I'm not saying it's the best, or only way, but it beats running multiple DMX cables to the stage.  Short version- some very brilliant people at a company called Artistic Licence in the UK figured out how to take all of the little bits and bytes in the DMX-512 protocol, stuff it into little packets and cram it all through modern ethernet cables. In fact we can now transmit over 30,000 universes over a gigabit network.  So let's math that out-

Art-Net III can carry up to 32,768 universes, each has 512 channels of control in it for a whopping 16,777,216 channels of control.

IF we were to use that to control RGB LED lights, that would give us just over 5 million pixels. Not that I'm advocating buying 5 million lights- but if you're considering it, please, please call me! I'd love to help you out with that!

SO- It's not a new protocol- just a new way to transmit it. They've also been super generous and released it through open source and made it easily available so that other people can use it.  I'm not going to go into a lot of the technicals on how it works, there's a great article on Wikipedia here: Art-Net and a link to Artistic-Licence's web site here: Artistic Licence. All of this makes it easier to get into the world of pixel mapping. Simply put- this is taking an RGB LED lighting instrument and using as a part of a video, or some type of graphic display.

So Why The Sudden Interest?

Full disclosure- I currently work at SE Systems in Greensboro NC. We're a live production company, as well as a pro audio, lighting, recording and video sales company. I primarily sell lighting and recording equipment.  Part of my job duties include finding cool new things to carry.

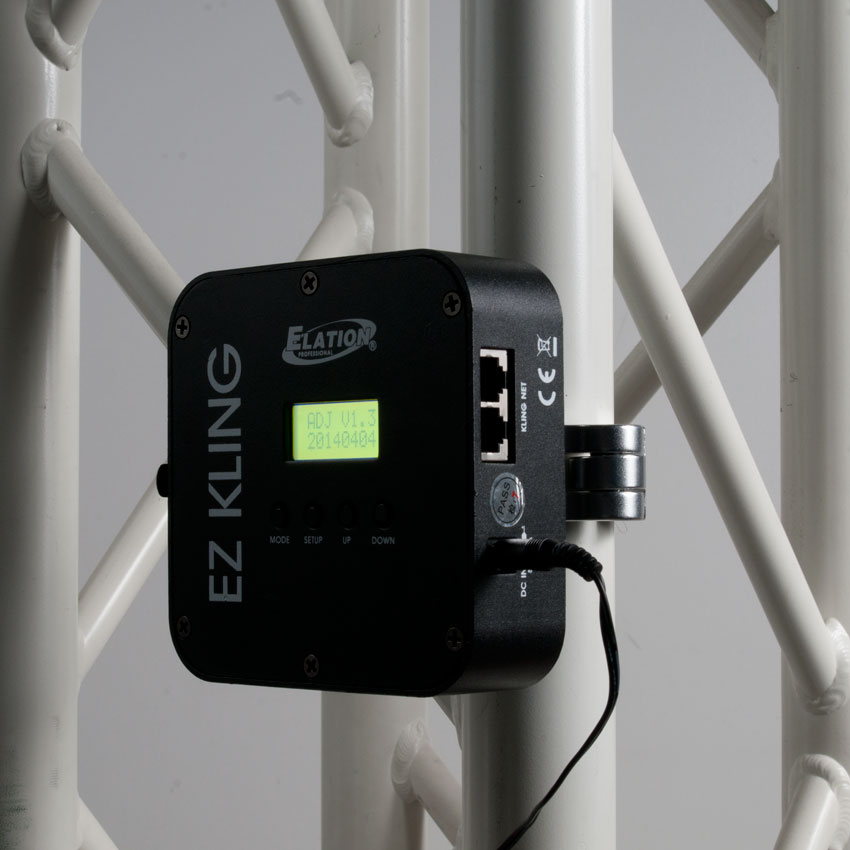
One recent discovery is the Elation Professional EZ Kling. It's a simple little black box network device that will either-

a. Convert KlingNet (basically put- a proprietary video to lighting protocol for pixel mapping lighting instruments) and Art-Net to DMX, or

b. Convert DMX to KlingNet or Art-Net.

So How Can I Use This?

There are several different ways to use the EZ Kling.  Here are a few examples:

  • Expand the DMX output of certain lighting control software, or consoles.
  • Pixel map lights that don't have Kling-Net, or Art-Net natively.
  • Capitalize on existing network infrastructure to control lights in multiple areas, by combining with an Art-Net input device such as an Elation Professional eNode 4 or eNode 8.
  • You could also potentially control small numbers of lights using a Wi-Fi network (I really wouldn't recommend this for large numbers of lights, or super critical lighting work.)

Stay tuned over the next few months as I explore some tricks using these handy little devices.

~Andy

Lighting Control: How to Get More Bang for your Buck..

This is going to be a bit of a longer post, but there's a bit to cover.  A little while ago a person identifying himself  as  StevieWonder posted the following comment on one of my posts:

"Also wondered if you have any recommendations on controlling dmx with software and an ios device or a cheap netbook, or if a standard controller would do the trick? Any advice you can give would be much appreciated!"

This immediately raised one question in my mind. How does Stevie Wonder program lights?

The Dilemma

Until very recently, complex lighting control wasn't very affordable. Even super basic fader controllers to use with a basic dimming system were still around  $900 once you figure in sales tax for 24/48 channels.  They won't control movers well and still use microplex-  which is an archaic control protocol. (Although when looking at what ArtNet and RDM are bringing to the table DMX is archaic too.  All of this is a discussion for another day)

So then we take a look at the basic controllers like the Chauvet Obey Series, or the Elation/American DJ DMX Operator series.  They're great if you only have say 12 different fixture types, and are maybe recalling movement macros, or color macros on your lights. You're probably not going to program the Kiss reunion tour on one of these. I feel like it would be similar to hanging drywall with a screwdriver.  You can do it. But it's going to take a lot of effort.

The Solution

I'm about to say something really crazy. This is especially insane considering over a year ago I posted this blog about choosing a computer for recording- Recording from Your Digital Console: Choosing a Computer. The most cost-effective way to get a lot of features in a lighting control system for not very much money is to buy a touch screen tablet PC running Windows 8.

Many of the current lighting control software options offer remote control via iPad, iTouch, iPhones, and some Android devices, but you have to have a computer to host the main part of the program. Why not just skip a step and buy a touch screen tablet? It will be cheaper than buying a desktop/laptop machine and an iPad. There are some great deals on new and refurbished units out there. You just have to shop around. New Egg and Tiger Direct are two great places to start looking. (Unless we happen to start carrying tablets at work- at which point I'll edit this post and add a link.  Yes, I know shameless plug, but I gotta buy gear too. And eat.  Bacon ain't as cheap as it used to be.)

The Software


For lighting control software there are two main titles I would look at.  One is the Avolites Titan One dongle. The other is Chauvet's Show Xpress. Conveniently, we carry both of these at SE Systems. I'm only going to highlight a few features of each right now. I'll probably go a little more in depth later.

Avolites Titan One

Titan_One_Avolites_900

This. Is. My. New favorite thing! The Avolites Titan one dongle has quite a few advantages working for it.  The first is that it's the same software that all of the Avolites lighting desks use. The Titan One all the way up to their Sapphire Touch use the same exact software. This means if you learn how to use one, you can use them all. Here's a few other advantages:

  1. Price Point- the retail price of this package is only $250.00 USD. You have to be kidding me! Pro level lighting control for less than $300. (OK well you still have to have a computer but still)
  2. Cue Stacking- This is a great feature that allows you to take multiple cues, and assign them to one fader. For example, say you have a look programmed for your house lights, a look for your upstage (back wall) uplighting, and a look for your stage/front lighting. You might have a volunteer running the console, or you may just want to be able to touch one fader to have all three of those things change at one time.  You can do that.
  3. Avo's Quicksketch-  This feature lets you quickly assign a picture or scribble your own to assign to buttons and faders. So you can have a picture that means something to you. Like a guitar for a guitar solo look. Or a picture of Bob if Bob is speaking this week. Or a big red button for your big red look. Or a smiley face with a big hat when the band covers "Happy." PharrellHappyArtNews600
  4. Pallets, Shapes and Pixel Mapper effects-  These are tools that allow you to build shows quickly and efficiently- Think of pallets as collections of attributes.  I have a box of colors. I have a box of moving light positions and movement patterns. I have a box of chases and color changes that I can draw from.  Then I can take these attributes, select the ones I want and place them in a cue or cue stack.
  5. YouTube- There are a lot of YouTube training videos linked on Avolites' website, or you can just look for Avolites' YouTube channel.
  6. The Manual- There is a very detailed manual available for this software that goes over each of the features.

Chauvet's Show Express

showxpress7-l

I've probably spent more time using this particular software than the Avolites. Part of that is that the Avo software hasn't been available quite as long. (At least not at work.) Here's a few things I like about it:

  1. Live Mode: This basically gives you a panel of buttons that you can use to trigger scenes or looks. Very simple interface for a beginning user or volunteer operator. Live mode can also be remotely operated via an iPhone or Android based app. (But if you're running on a Windows 8 machine, there's no need to. Unless you want multiple pages of scene triggers- which might be super handy.)
  2. You can trigger multiple scenes in different windows of live mode. So if you have your uplighting blue, and your stage lighting green- as long as you have those scenes saved separately, you can recall them individually, but at the same time.
  3. Start in Live Mode:  You can actually set the software to start up in "Live" mode so that the operator doesn't have to deal with the set up or programming options.

So this is just a super basic overview of two systems. I may write a more detailed write up of each system in the future.

~Andy

Programming Inexpensive Lighting Controllers- Part Two B: Programming Scenes- Strategies

Obey 40 and Obey 70 Scene Buttons A Theoretical Problem

Say for example I just bought two really sweet new moving head lights. I can't wait to break them out. I've been asked to DJ a wedding reception in the garden atrium of the local swanky hotel. It's going to be a great night. 9:00 PM rolls around, a lot of the older guests have left, and it's time to start the dance party. You fire off the new dance mix of a Taylor Swift song, the dance floor is packed and you fire up the movers! They're moving all around, changing colors, and flashing.  It's like a mini club, and everyone is dancing. It's great! You see the bride's Aunt Wendy doing some sort of worm meets electro-boogie dance in the middle of the floor. You suddenly realize she's actually severely allergic to peanuts and is having some problems. You need to get control of your lights quickly.

We'll explore a few strategies for setting some scenes on your controller. These are just a few ideas I've used that work. They're not the only way to do things but they might be a good starting point.

Know your event

I have recently had to help a few customers program their Chauvet Obey 70 controller, and lights.  One gentleman was a member of a party band, and another customer DJ's a lot of wedding receptions..  We tried to program some scenes that would generally work well for most weddings for both customers.

The first step is to plan ahead. Know your event. Know when things are going to happen. Most wedding receptions follow a similar order. Things start off pretty chill, the bridal party is introduced, there's a father/bride dance, food might be served, a cake is cut, flowers are thrown, and at some point (hopefully) a raging dance party ensues.

Considerations

Since most wedding receptions start off pretty low key, keep the lighting low key.  Let your light show build as the evening builds.  This sets up a few things well.

  1. The first dance, father/daughter, etc usually happen early in the evening. If you fire up your movers, lasers, etc during these songs, you risk putting dots of color across the people dancing. Why is this a problem?  It will look weird in the photo album.
  2. If you're playing light dinner music and your light show is screaming "Disco Inferno" you might make someone nauseous. The other thing to consider is that your mirror ball might loose it's impact if it  runs all night long. Save it for a special slow song.  You wouldn't play Abba's Dancing Queen all night would you? Then consider cycling lights on and off throughout the evening.
  3. If you're using a controller that has multiple layers or scene banks, consider putting a "white" scene on each layer, with your movers pointed straight down at the floor or up at the ceiling. That way if Aunt Wendy goes into a fit, you can quickly bring up lights, pull the movers off the crowd and out of people's faces.

~Andy

Recording From Your Digital Console: Choosing Recording Software

Picking Up the Lingo I'm going to start off and just throw a few terms that I might use in the series out there. That way we're all on the same page, and I don't have to type the words "recording software" every other sentence. This may also help as you explore the interwebs and research what options might be best for you. So, without further ado-

The Terms:

DAW- This stands for Digital Audio Workstation. This is what we generally call the software, whether it's Pro Tools, Cubase, Studio One, Reaper etc.

ITB- This is simply an abbreviation of IThe Box. The box in this case is your computer. Some recording engineers prefer to mix out of the box, meaning they're using an audio console to mix their recording projects. Some prefer to mix in the box using the faders in the software.

Plug-Ins- Plug-Ins are virtual equalizers, compressors, reverb and other effect units.  In analog world we would typically patch or plug these into our mixer using cables. Many times ITB we just use a drop down menu.

DAW's- The Contenders:

I'm going to start by answering this question with a question. Which DAW do you like? There are free options like Audacity (which doesn't play nicely or at all with Audinate's Dante Virtual Soundcard. It could have been a problem on my end.) Reaper is a nearly free option ($60 for students or non-profits $255 for everybody else.) Both of these are distributed directly from their websites

Then there's the paid options.  Most people have heard of Pro Tools. It's an industry standard in the professional recording world. Then there's others like PreSonus' Studio One, Steinberg's Nuendo & Cubase  family of products, Sonar by Cakewalk, and Apple's Logic. Each one of these has it's own set of advantages and disadvantages.

So Which One Do I Choose?

It really depends on your end result, and your workflow. Personally I don't have a lot of hands-on time with the Steinberg family products, or Sonar. My two personal favorites are Pro Tools and Studio One. I typically use Pro Tools the most.  I'm just used to the workflow, the keyboard short cuts, and I like the routing matrix.  I would encourage anyone with a little time on their hands to download demo versions of any of  these software packages and try them out. See which one you like.

~Andy

Recording From Your Digital Console: Choosing A Computer

MacVPCCutting to the Chase Buy a Mac.

But Seriously

Buy a Mac. (Are we beginning to see a bias?) This article is a bit tongue-in-cheek.

My Case Against Windows

Have you ever been computer shopping? On the Windows side of things you have Dell, HP, Gateway, Acer and others. Then there's the specialized machines from companies like ADK, Alienware, or Music XPC.  That's seven different manufacturers that I've listed off the top of my head.  Some of those companies have as many 15 different product lines. Each one of these uses different chipsets, different USB and Firewire buses. If you want to see what's available feel free to go to a website like Tiger Direct (www.tigerdirect.com) or New Egg (www.newegg.com.)

My point is, the operating system, Windows, has to be compatible with all of these different machines. It also has to work with all of these different parts. That's a lot of programming code.  There's a great opportunity for something to just not work quite right. When things do go wrong, who do you call? Microsoft? Dell? The mother board manufacturer?

Finally, what version of Windows do you buy? Home, Professional, Ultimate? 7 or 8? Lots of choices. These choices can affect how your computer and audio hardware interface with each other. I will say this. If you are considering Windows 8 for a recording/production machine- wait. The various audio software/hardware manufacturers still need time to update software/hardware drivers. (I would actually say the same thing if Apple just released a new operating system.)

The Argument for Mac

There was a period in my life that I worked in the Keyboard & Recording department at a chain music store. Typically if a customer purchased any recording, or music creation software from me, I'd offer to help them get it installed if they had issues. Granted at this particular time there was a version of Windows called Media Center Edition. That particular version would absolutely not work with external sound cards. Period. Ever. Other than that, it would often take multiple install attempts to get a particular software working. I rarely had Mac users come in with trouble. Things boil down to this. How much time to you want to spend trouble shooting your gear, vs how much time you want to be using it.

If you happen to visit the Apple website, you'll notice there are only five series of computers.  That's considerably less than the plethora of  Windows options. Your choices are two laptop lines, and three desktop lines. Then you have to take into consideration that Apple builds it's own computers, and their operating system (OS X.) That has to guarantee a certain level of cooperation between the software and hardware.

My final argument is that OS X, Apple's operating systems supports Aggregate Audio Devices.

What Do Aggregate Devices Do for Me?

In simple terms they allow you to use multiple sound cards within OS X or within applications that support it. Why is this useful? Well, let's look at our scenario from the previous post in this series. In this case there was a digital audio console at front of house, pumping 32 channels of audio to a computer back stage via a Dante network.  The computer was using Dante's Virtual Soundcard. Unfortunately, because it was a Windows based machine the only audio device it could use was the virtual sound card.

This was extremely problematic for using local audio monitors. One work around would be to close the session, and then re-open it.  Then an Avid M-Box, PreSonus Audio box, or similar device could then be used to connect studio monitors. This would not offer real-time monitoring of input. A second option would be to add another Dante device to the network, in the broadcast room to connect a pair of studio monitors to.

By setting up an aggregate device inside Pro Tools, you can then use the Dante Virtual Soundcard (in this particular case) for input, and select an M-Box or other small interface to use as output for local monitoring.

~Andy

Illuminating DMX: Part 3 B- DMX Protocol Charts vs Faders

lights and charts and stuff What Are We Trying to Accomplish?

In my last blog we talked about DMX Protocol, or implementation charts. They're basically a list of parameters that can be controlled with a DMX controller. In this post we're going to look at how faders on a basic controller transfer to controlling parameters on a moving head light.

Something To Note:

I have forgotten to mention this important fact in previous posts.   DMX transmits data in 256 steps, in numbers ranging from 0 to 255. So if your fader is all the way down at zero, you're sending number value 0 down that DMX channel.  If your fader is at 100 %, all the way to the top, then you're transmitting number value 255. Certain parameters in a lighting instrument are looking for a specific value to perform a specific function. For example on a Chauvet Q-Spot 360, if you transmit between values 10 and 19 on channel 6, you tell the color wheel to rotate so that the light's output will be red.  If you change that value to 47, the color wheel will turn to blue.

What Are We Using?

I initially thought about using a higher end instrument like a Robe Robin DLX Spot, and a Chauvet controller for our example. I thought about it, I decided to go with a more affordable lighting instrument that a band or small club might have. I also decided to go with a non-programmable controller that would still be fairly common. This wouldn't be the ideal situation at all, and we'll get to why eventually. Here's what we're using

Light:

I recently special ordered a Chauvet Q-Spot LED 360 (www.chauvetlighting.com) for a customer. They are using for a travelling trade-show booth.

Controller:

For our illustration, I'll use an "Super Basic 5000 mk MCDXII Universal DMX Controller." It's a completely made up 16 channel controller. They don't really exist but it was easy to draw in the software I use. I chose this because I can create a basic drawing with faders and label them. This will help you visualize how the faders will correlate to parameters on the light.

We'll pretend it's similar to aLeviton (Formerly NSI) N7016-D00 Console (www.leviton.com) because it is a fairly common console to find in houses of worship. It's a basic 32 channel DMX controller. You can either use it to control 32 channels, or control 16 channels and have two scenes.  That's it. 32 channels of control. No programming. Two scenes. They were really designed to control dimmers, but today we're connecting a mover to it.

What Do We Need To Know?

I always recommend reading the manuals first. This will at least get you in the ball park on how to operate your gear. For our example we'll assume the manuals have been read.  Let's take a look at our equipment.

  1. Our pretend 16-channel controller controls 16 DMX Channels. Since it's not a very fancy controller, there's no LCD Display to tell us what value we're transmitting on each DMX channel. The basic Leviton controllers work the same way.
  2. The Chauvey Q-Spot 360 can operate in two modes. On this instrument they're called personalities. Other manufacturers call them modes. It's important to note that we can run this in an 11 Channel mode or a 14 Channel personality (mode). This dictates how many DMX channels the instrument uses. (Manual Here.)

How Do We Do This?

  1. We'll need the DMX Protocol Chart for the Q-Spot. It's in the manual. We'll need to look at the 14-Ch personality.
  2. We need to connect the power cables, DMX cables and power things on.
  3. We need to properly address the Q-Spot. Since our controller only goes up to 16channels we have to stay under address 016. We also have to keep in mind that we're running the light in 14 channel mode, so, for example,  if we address it at DMX Channel 013, then then we'll only be able to control 4 of the light's parameters. That means there's 10 things kinda hanging out there that we have no control over what so ever.  For this example, we'll address the light at DMX address 001. That way fader one will control the first parameter, fader two will control the second parameter and so on.

The picture below shows our basic controller. Each fader is numbered, and labeled indicating what parameter of the Q-Spot it will control.  Hope this helps!

Lighting Controller

~Andy

Illuminating DMX: Part 3 A- DMX Protocol Charts

DMX Protocol Charts What is a DMX Protocol Chart?

In basic terms you could think of a DMX protocol chart as an address book. They list what paramater of a lighting fixture is controlled at each DMX address. The charts are usually found in an instrument's owners manual.

Why Do We Need to Know This?

If we look back at  "Illuminating DMX: Part 2- Addressing", there's an example using a simple controller, two dimmer packs, and some par cans. One lighting instrument was controlled by one fader on the controller.  This was a typical system a few years ago.

Recently  however, LED lighting systems, and moving head (often referred to as movers) lights have gotten extremely affordable. These instruments use multiple DMX channels, and therefore multiple faders. The chart will tell you what fader to move to control which function of the light.

What Are We Controlling?

The functions of a lighting instrument vary from manufacturer to manufacturer. They can also vary depending on what mode the instrument is operating in. Some units even allow you to change the number of channels they use. Let's take a look at some of the parameters.

A Robe Robin DLX Profile, a Chauvet Intimidator Spot 150, and a Robe Robin DLX Wash

We'll start with some typical mover parameters:

  1. Pan- this turns the head of the mover. Like shaking your head "No."
  2. Tilt- moves the head up and down. Like shaking your head "Yes"
  3. Zoom- changes the size or diamater of the projected beam of light
  4. Focus- Changes how sharp the projected beam of light or image from the light appears. Similar to focusing a projector
  5. Color Wheel(s)- Some instruments have a wheel with fixed colors such as red, blue, green, violet, etc. This paramater would turn the wheel to the selected color. Others use a series of three wheels to mix colors.
  6. Gobo- A Gobo is a metal or glass piece that has a pattern on it, that Goes Between (hence the term Gobo) the lamp and the lenses that project an image, or can break the light beam up so it makes neat patterns in the air. A classic yet semi flawed example of this is the search light Commissioner Gordon uses to signal Batman.
  7. Dimmer- This one's pretty straight forward. It changes the intensity of the light blasting out of the instrument.

And now some typical LED wash light parameters:

  1. Red- Changes the intensity of the Red LEDs from 0 to 100%
  2. Blue- Changes the intensity of the Blue LEDs from 0 to 100%
  3. Green- Changes the intensity of the Green LEDs.
  4. Color Macros- Depending on what DMX value is transmitted, this will change the light to a pre-set color. This paramater usually overrides the Red Blue & Green (RGB) settings.
  5. Strobe- makes the instrument flash.
  6. Auto Programs- this will engage some built in color change patterns
  7. Speed- This will change how fast the auto-programs cycle.
  8. Dimmer- This would function as a master dimmer for the instrument

So What's Next?

For the next post in this series we'll take a look at an actual DMX Protocol chart and break down each paramater and how that relates to faders on a controller...  Stay tuned!

~Andy

See Illuminating DMX: Part 2- Addressing here.

Continue to Illuminating DMX: Part 3B- DMX Protocol Charts vs Faders here.

Programming Inexpensive Lighting Controllers- Part Two A: Programming Scenes

Obey 40 and Obey 70 Scene Buttons In my last post in this series, "Fixtures" I discussed properly addressing lights so that they would correspond with the proper fixture button on the Chauvet Obey series controllers. I've decided to break the scene programming posts into two sections. In the first part I'll just talk about actually programming the scenes. Which buttons to press, and in what order.  The second part I'll actually go over some strategies for creating scenes, so that the controller really works for you, rather than against you.

So How Do We Do This?

Starting off we have to remember that the Obey 10 doesn't have scenes. So we'll skip that one for now. The Obey 40, and 70 do use scene memory, as does the Elation DMX Operator. We need to find the program button.

On the Obey 40 look for the big "Obey 40" logo on the right side. There are two columns of buttons directly to the right of the logo. The Program button is the third button down, on the second column from the right.

Obey 40 Program Button

The Obey 70's Program button is the top right-hand button, just under the LCD display. If you look for the Obey 70 logo on the right hand side of the console, you'll see two faders directly to the left of the logo.

Obey 70 Program Button

Now that we have located the Program button, hold it down for three seconds. Boom! Now we are in program mode! This will be indicated by a little light blinking in the lower left hand corner of the LCD Screen.

Programming a Scene

First, select the fixture you want to control. Adjust the faders to create your look. To adjust the first   Then press the "Midi/Add" button.  On the Obey 40, it is located just below the "Program" button.

Obey 40 Midi/Add Button

The Obey 70's "Midi/Add" button is the top left button in the group of buttons located just below the LCD screen.

Obey 70 Midi-Add

After you press the "Midi/Add" button, press one of the scene buttons to store your look to a scene. Lights on the controller will blink to let you know the scene is stored. Congratulations! You've programmed your first scene! Now simply repeat this process to create additional scenes.

But Wait, There's More!

If you've created eight scenes and decided you need more, don't worry! The Obey 40 and 70  can each store 240 scenes. There are 30 banks of scenes that you can use. (30 x 8 = 240.) So you can select other banks to store to even after you press the "Midi/Add" button.

To access those other banks, simply locate the "Bank Up" & "Bank Down" buttons. The buttons are located right above the "Program" button on the Obey 40, and to the right of the "Midi/Add" button on the Obey 70. Then press "Bank Up" to move from Bank 1 to Bank 2, and so on. The LCD screen on the controller will indicate what Bank you are currently in.  "Bank Down" will move your bank selection in the opposite direction. Please note that if you are in Bank 1 and press "Bank Down" the controller will move to Bank 30.

That pretty much sums up how to program scenes into these controllers. In the next part of this series I'll discuss some ideas on building scenes that can maximize the use of these controllers, and your lights.

For more information on the Obey Series Controllers, check them out at SE Systems, here: Obey Series Controllers

~Andy