
Do I *have* to Use DMX Cables?
First I'd like to thank Gavin Schafer for the photo... You can see his Flickr feed here.
The Question:
I run into this question a lot at work-
"Do I have to use DMX cables, or can I just use mic cable."
The short answer to the question is, "Yes, but I don't recommend it." So, that being said- there's a few things that we need to know about DMX cables and what makes them so special. I'm not going to go into a lot of super-technical detail here, but instead give a broader overview.
A Little Background:
First DMX, or more technically correct DMX-512 is a data communication standard developed by the United States Institute for Theatre Technology- USITTIt is designed so that lighting equipment manufacturer's equipment can communicate with each other.
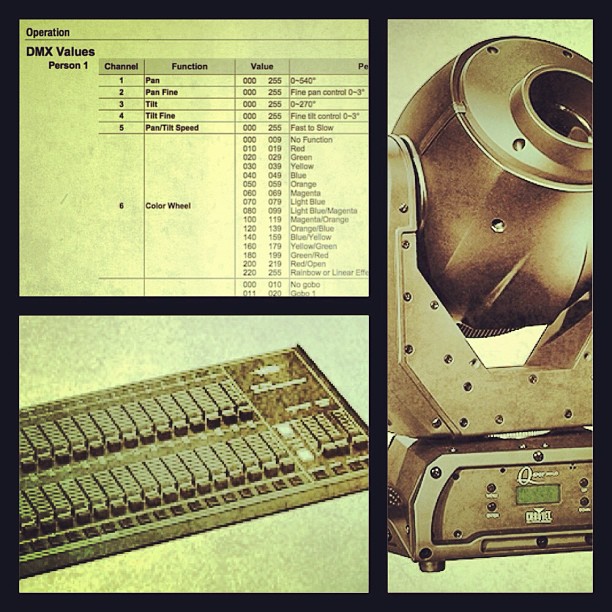
An example might be- an Avolite controller, can control a dimmer made by Leviton, or a moving-head light made by Martin. A Martin controller can control lights made by Martin, Robe, Chauvet, or anybody- as long as they're all using the DMX-512 standard. It's just like if I were to decide to hold a global summit in London this afternoon, I would hope that we all speak English so we can all understand each other and accomplish our objective goals. In this particular example the delegation speaking Latin is not going to work well with the rest of us.
A second notable fact is that the DMX-512 standard dictates that we should be using 5-pin connectors on our DMX-512 cables. This was decided a long long time ago.(like in the 80's when big hair and spandex were cool.) By using a 5-pin connector, it prevents someone, say, David Lee Roth from plugging his mic into the lighting rig. This means that according to the standard set forth by USITT, a DMX Cable terminated with 3-pin connectors is *technically* -NOT- a DMX cable. Some manufacturers, especially of lower end gear, just started using 3-pin because it was cheaper and 3-pin cables are everywhere.
Finally there is a specific amount of impedance in a DMX-512 control system. Impedance is the opposition to the flow of current in an alternating current circuit. In this particular case, the standard states that it should be 120 ohms. Why this matters is that the DMX cables are carrying digital data. The streams of DMX data are carried down the cable in extremely short burst called packets. (think little suitcases of information with tags on them saying what airport they're traveling to etc.) I may not be totally 100% explaining this technically correct, but if the impedance is not correct it can create a scenario where there are packet reflections. This can cause lights to behave erratically, or spazz out. What happens when you're flying to San Francisco and your suitcase ends up in Detroit? Or think about what happens when you try to tell somebody something across an empty gymnasium. The echoes of your voice blur the clarity of what you're trying to say and make it difficult to communicate.
Some Answers:
I don't really care about the whole 3-pin vs 5-pin debate. Lighting gear using 3-pin connectors is here to stay. So why use DMX cable? In production world- time is money. If I can take a step early on that will eliminate headaches in the long run, I will. Why waste time at a gig trying to figure out why light number five is strobing, and why light 8 won't do anything. This means making sure I have the best data path for my controller to communicate with the lights. In fact we have a line of very inexpensive mic cables that we sell at work. I've noticed that these cables absolutely will-not pass data when used in a lighting rig. If I know all of my cables are good, then I've probably just addressed something wrong, or programmed something wrong on the controller.
~Andy